ChatZilla window


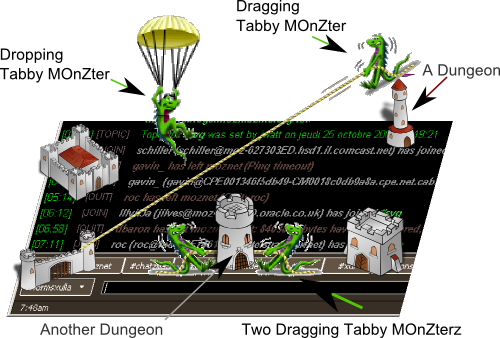
ChatZilla 0.9.80 release introduces a great innovation: the Dungeons And Dragon tabs.

Here is a picture of what the game looks like:

Tabby MOnZters

Dungeons are optional of course, you can supply them yourself. But at least one gecko MOnZter is included.

Drag-and-dropping the tabs is fun, and it can be useful too. You can reorder your tabs in any order, alphabetical, activitical, randomical…, anything you like:

DnD tabs

Also, if you’re lucky enough to run an OS which supports it (so, not Windows 2000), you will see a transparent copy of the tab being dragged:

Chatzilla tabs - Drag and Drop

 ChatZilla transparent copy of tab being dragged

Of course, being transparent, the copy of the tab is rather hard to capture on a screenshot, but you get the idea. Now, have fun!

 That is all!

N.B.: The Tabby MOnZterz are from the Mozilla Museum , the Dungeons are open source SVG cliparts from OCAL – Open Clipart Library.
 Which means that if you’re using the cutting-edge Firefox and SeaMonkey releases, you can play “Spot the Gecko!”.

Here is the proof:

Gecko animation

Motifs authors can stick an animated PNG in their CSS, just as a normal static PNG.

Use Justin Dolske’s APNG Edit extension to create beautiful animations yourself!
(Requires Firefox 3.0b2 and higher)

What is ChatZilla?

Good question! The answer is: It’s an IRC client, or software.

Let’s start at the very beginning, and study in details the anatomy of the first ChatZilla window, right out of the box, without any plugin or motif, all naked.

ChatZilla window anatomy (*client* tab)

So, let’s see the important bits here.

First:

  • The cZ icon, and the window title, saying “ChatZilla!”. In case you’re wondering, the cZ icon uses the font Cooper Black Outline BT.
  • The very important MENU BAR, to make your life easier.

Second, we find a TAB, the very first TAB, which is called *client*. It has 3 parts:

  • The Header, which tells you important things, like the number of built-in or connected networks, the ChatZilla release number, etc.,
  • The Userlist, on the left for now, and it’s empty,
  • All the rest, which will be the chat area. There are things written in the *client* TAB, these things are important to read, at least once!

And, of course, we see also:

    • The Name of the tab, at the bottom left corner. (*client*, here)

Third, we find:

  • YOU! Well, not you, but your default nick. If you connect to a network without chosing another nick, you’ll be known as that, the nick which shows here on the *client* tab.
  • The Input Box. It works pretty much like a URL bar: you type stuff in it, and the stuff is sent to the chat area that you are currently viewing.
  • An arrow pointing to the top.

Fourth, and last:

  • Something which looks like a worm: it’s the connect icon, which tells you if you’re connected to the Internet, or not.

That is all!

Next, we’ll study the anatomy of a network TAB, and how to get there.